Thursday, December 4, 2008

LWX & LWY/Electrical Conduit

I've read of a lot of people having issues with the angles and lengths of LWX and LWY. Thankfully, I was able to learn from their issues and had relatively little trouble in putting the pieces in place. Basically I cut everything a little bit oversized and over angled and then sanded till I had a good fit. Also, instead of using nails to hold them in place I used drywall screws. After everything had cured I removed the screws and filled the holes with flox.
Port:

Starboard:

A closeup of the joint between LXY and LWY:


For the electrical conduit I followed the plans and formed a male plug which I covered with box tape. After taping the plug and the board I would be working on, I put one ply bid over the plug:


Then covered with peel ply:

Here's the conduit extension on top of the foam :


And five-minute epoxied in place:


Now I just need to place the foam around the conduit, add 6 plies of Bid, fix one minor repair area on the upper longeron and cut the sides to size and I'll be finished with ch. 5. Hopefully by next Wednesday!

Lower Longeron Doublers


The lower longeron doublers were pretty easy. The idea is to provide a square section for strength and to create the area for the electrical conduit area. Basically just floxing another triangular piece of spruce onto the lower longeron.


I used lots of clamps -


And the finished product -

Upper Longerons Glassed and Lower Longerons in place

It's been a while since I posted due to a wonderful new addition to the family - Alyssa Faith Bennett was born on September 11 and has been keeping us all pretty busy. I have been able to get a little bit of work done though. I got the upper longerons glassed:


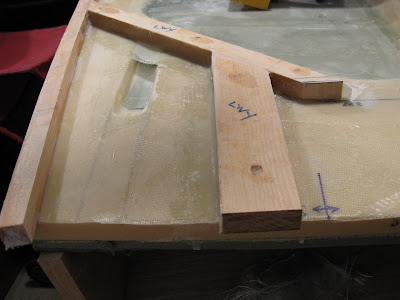
Then cut and placed the lower longerons. I used the method of cutting little blocks of wood to get a good clamp on as well as pre-drilled holes for nails to hold everything in its proper place.
Starboard side:


And Port:

Monday, July 28, 2008

Fuselage sides glassed

I completed glassing the fuselage sides (interior) tonight. As I've read, it did end up taking a while. I started at 2100 (or 9 o'clock pm) and didn't finish until 01:30. I didn't realize how long it was taking until Julia came out at 0000 (or 12am) to see how I was doing. I'd just finished the first ply of uni! All in all, it was a pretty easy layup. I'd prepared everything before starting, so that helped a lot. I did spend a good deal of time on the areas where the spacers meet the other foam, but I'm afraid that I'll still end up with an air bubble or two. Should be pretty easy to fix any problem areas though. As I finished at 0130(midday in my day), I've been out there every couple of hours and only seen one possible problem area where the spacers meet the foam on the aft end of the starboard side. We'll see....


Friday, July 25, 2008

Fuselage Sides Spacers & Control Stick Indentions

The last couple of weeks I've been working on sanding the spacers to their proper dimensions. Here they are micro'd on to the fuselage sides:


The electrical conduit cutouts:

The upper longerons are there just to make sure that they fit properly. I've also sanded out the control stick depressions.

I tied my sharpie to a piece of 4" metal hanging wire (seen in upper right corner of pic) attached to a nail to get a somewhat perfect circle. I used same said nail to verify that the depression was a 1/4" deep by marking a line at where the top of the foam met the nail, and then measuring a 1/4" down from there. As soon as I saw the second blue line on the nail, I knew that I'd made it a 1/4". Also laid a ruler across the depression to verify consistency of depth across the depression.

I've marked out the depression for my Vance Atkinson fuel gauges, and will sand those out tonight. Hope to get everything glassed in the next day or two. I've read that it can be a rather large lay up, so will likely devote a whole day to it.

Thursday, June 19, 2008

Fuselage sides

Started work on the fuselage sides and got the masonite placed on the jigs, foamed 5-min epoxied to the masonite and cut out the spacers, although I haven't completed sanding the spacers to the proper angles.

My masonite:
Nailed down to the jigs:
I cut the foam and masonite before doing all the jig work:
5-min epoxying the foam to the masonite:
And some of the foam spacers laid out:

Upper Longerons

I started working Ch.5 around the beginning of June. Ch.5 is where you build the left and right sides of the fuselage. I finished up the upper longerons last week. Overall, they went pretty well. The only issue I had was with the jigs "FJA." The jigs are there to provide proper curvature for the upper longerons and then the fuselage sides.

Most are simple cuts (i.e. 42" long with one side 6" high going to 1.5 " high - a nice simple strait line) but FJA has a bit more curvature to it. The first time I made the 4 FJA jigs, I did them each seperately and ended up with something I was not happy with. The second time around a cut one FJA jig exactly how I wanted it, but about 1/20th of an inch to high. I then traced my "master jig" for the cutting of the other jigs, clamped them all together and sanded with a 1/4 sheet finishing sander until all of the FJA jigs were identical and at the proper hieghts. Also, the plans call for 2 1"x 1"x 8' pine boards. I needed 4. Even if I hadn't destroyed a set of FJA jigs I would have needed 3.

Here are the jigs laid out and ready for the longerons. I screwed the jigs into my tabletop:


The longerons are made of 3 thin strips of spruce held together with epoxy between each strip. I went ahead with the plans method and used nails to hold them in place while curing. Looking on other people's sites, I saw that many of them had 30 or so of those nice $20 clamps that they were able to use to hold them in place. If I had 30 of those nice big clamps, I would have gone with that method. The nails seemed to work pretty well though.

Both sides:
Here's a closeup of the nailed sections:
Doubler's and stiffner's with saw cuts for bends:
All weighted down:
And complete. Not sure why a bunch of stuff up there got underlined. Couldn't make it go away, oh well.


Monday, June 9, 2008

Chapter 4 complete

I did manage to finish the firewall on May 29th, just haven't had time to post anything. Or, rather, haven't taken the time to post anything. Currently working on Ch.5 fuselage sides. Will post more later.

Thursday, May 29, 2008

Firewall

I'm almost done with the last bulkhead of chapter 4! I've finished the firewall except for the last layer of bid on the fwd side, and cutting the temp firewall (which might wait until I'm in ch.6).
I cut the firewall out of 1/4" birch on Monday night, and cut and installed the 1x1x1/4" alum. inserts for the engine attach points on Tuesday night/Wed. early a.m. How early? Ask Julia - the power tool section of the project (cutting the alum., cutting the holes for the alum.) didn't wake her ~ forgetting to close the garage door and lightly tapping the hard points into the birch however, did. Sorry! To ensure a good bond with the birch, I sanded the aluminum with 60 grit sandpaper and epoxy to prevent any oxidation before installation and fiber glassing.
Here's the 4 piece section of the firewall with alum inserts installed:

And a detail of the alum. inserts:

For the 14 blind screws, I drilled the holes after glassing one side and cut a countersink:

I did diverge slightly from the plans after reading about problems of having the screws turn later on. After looking at either cutting a cross shape into the screw head or installing piano type wire inlaid into the screw head and birch, I decided on the cross shape.

Here's what it looked like:

And after installation with flox:I should be able to glass this side this afternoon before I go to work as my wife has a wedding rehearsal to run tonight. Chapter 5 will have to wait until the 6th of June however, as I start my week on tonight. If I finish up the firewall tonight, I'll probably post the requisite "all bulkheads together and in position pic.

F-22/Doubler

Well, I guess that I didn't keep things as updated as I meant to. 1 post at the beginning of may, and now one at the end. Again I have been working on things, but simply not posting. Some small boring things that don't warrant photos, much less a post, such as finishing tracing my firewall drawings, sanding, and reading.


I did manage to finish F-22 and the doubler though.

F-22 with doubler installed:

Glassed and waiting for cure:

Here's a close-up of where F-22 and the doubler meet:

And finally, F-22/doubler completed. I've been sanding off the excess fiberglass and I'm afraid that it is all over the bulkhead here. No, my bulkhead is not full of air pockets!

Thursday, May 1, 2008

Aft Gear Attach Bulkhead

I completed the aft gear attach bulkhead. Here it is ready for glassing:

And glassed:


I'll try and do better about keeping my blog updated in a more timely fashion. On the plus side, I've started a new 7 days on - 7 days off shift which should allow me more time to work on the aircraft. On the minus side, I've started studying for my dispatcher license and that will take up a good deal of my time in the near future. Minus being that I'll have less time to work on the aircraft, getting my dispatch license is definitely a good thing overall. Just have F-22 and the firewall left in chapter 4. Hope to complete that next off week (I start my on week tonight) and get things prepped for Ch.5.

Forward Gear Attach Bulkhead & F-28

I've completed the forward gear attach bulkhead and F-28. I traced the outlines for the G.A.B. hardpoints onto the solid fiberglass from the plans and cut them out using the router attachment a fiberglass cutting bit for the dremel. It wasn't easy and I ended up cutting close to the trace lines and then sanding w/ 36 grit sandpaper to fit. Worked well, just took a while.


Here are F-28 and the upper portion of the forward GAB and F-28 ready for glassing:


The upper and lower sections will be joined later. Upper portion of the forward GAB completed:


The lower section of the forward GAB ready for glassing:

And completed:


F-28 completed:


IP Complete

I realize that I haven't posted in a while, but I have been working on the aircraft. The IP is complete now. I finished glassing and then added the stiffeners. Here you can see them cut and laid out. I might add that I shortened the vertical stiffeners when I realized that they were too long:
I used 2x4's to hold the pieces in place while 5-min epoxying them into place:


All stiffeners in place w/ micro along the edges:


For the electrical conduits I would glass first the single ply on the upper surface, allow it to cure, and then do the 2 plies for the conduit itself as shown below:

Finally, the IP completed: